How do you make a hitch tightener?
2024-12-05 09:07:48
Securing a trailer hitch is crucial for safety and efficiency during towing. A properly tightened hitch reduces vibrations, prevents sway, and ensures the load remains secure. But how can you make a hitch tightener that performs well and is easy to use? This blog explores the process of creating a hitch tightener, breaking it into simple steps while providing valuable insights for enthusiasts and manufacturers. Whether you’re interested in DIY solutions or optimizing production for hitch tighteners, this guide will provide the clarity you need.
What Materials Do You Need to Make a Hitch Tightener?
Choosing the Base Material
The material for a hitch tightener must be strong enough to withstand towing forces yet light enough for practical handling. Galvanized steel and 304 stainless steel are popular choices due to their durability and resistance to corrosion. These materials ensure longevity and reliability, even in harsh weather conditions.
Essential Components
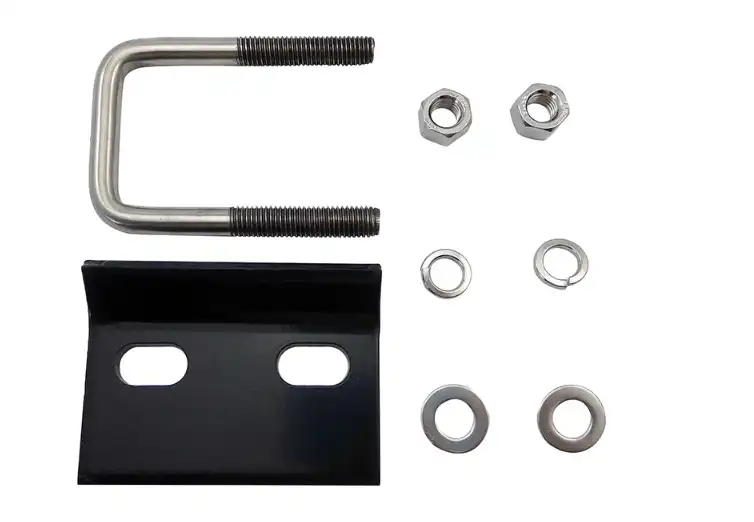
A well-designed hitch tightener typically includes:
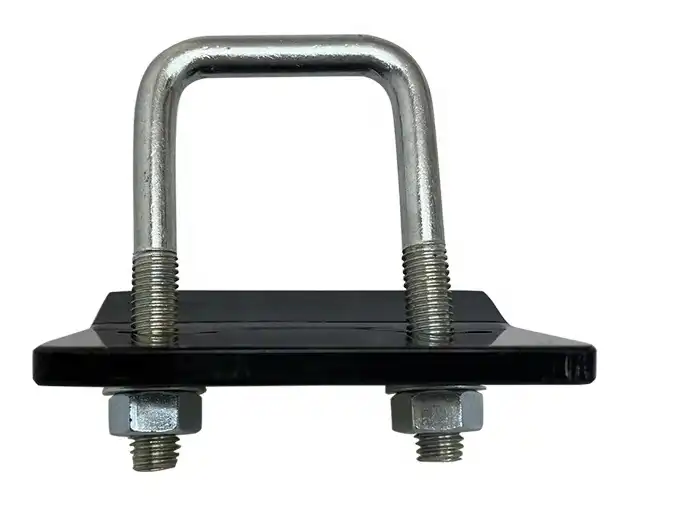
- U-bolts: U-bolts are integral to securing the hitch tightener to the vehicle’s hitch receiver. Typically shaped in a "U," these bolts wrap around the receiver to hold the tightener in place. The ends of the U-bolt are threaded, allowing nuts to be fastened securely to ensure the hitch tightener stays firmly attached during use. The strength and durability of the U-bolts are vital in preventing any movement or shifting, offering a stable foundation for towing or carrying accessories.
- Anti-vibration pads: Anti-vibration pads are strategically placed between the hitch and tightener to minimize noise and reduce movement. These pads, often made of rubber or similar materials, dampen the vibrations caused by towing or carrying heavy loads. By absorbing the shock and friction, they ensure a snug, secure fit while reducing rattling, which can be annoying and potentially damaging to the hitch and vehicle. These pads contribute to a quieter and more stable towing experience, improving overall performance.
- Tightening mechanism: The tightening mechanism, usually composed of bolts, screws, or clamps, is responsible for applying adjustable pressure to secure the hitch tightener. This mechanism allows users to customize the tightness of the connection, ensuring that the hitch stays firmly in place. By turning the bolts or clamps, users can achieve the ideal level of pressure, preventing any unwanted movement or play in the hitch. This adjustable feature helps accommodate different sizes of hitches, providing a versatile solution for various towing needs.
Tools for Assembly
You’ll need basic tools such as:
- A wrench for securing bolts:A wrench is an essential tool for tightening and securing the bolts during the assembly of a hitch tightener. This tool provides the necessary torque to ensure that the bolts are fastened tightly, preventing any loose connections that could lead to instability or rattling. A combination wrench or adjustable spanner is commonly used, depending on the size of the bolts. Using the correct wrench ensures that the bolts are securely tightened without over-tightening, which could damage the components.
- A drill for precision holes:A drill is crucial for creating precise holes for the U-bolts or other components that require mounting. Accurate hole placement is necessary for ensuring a proper fit, as misaligned holes can cause the hitch tightener to be improperly secured or misaligned with the hitch receiver. A drill with various bit sizes can help accommodate different types of fasteners, allowing for a smooth and efficient assembly process. This tool helps maintain the integrity and safety of the hitch setup by ensuring proper alignment.
- A tape measure for accurate dimensions:
A tape measure is essential for ensuring the correct dimensions and alignment when assembling a hitch tightener. It helps you measure the distance between holes, ensure the U-bolts fit properly around the receiver, and verify that all components are positioned accurately. Precision in measurement is key to achieving a snug fit and a secure connection. Using a tape measure reduces the risk of errors and ensures that all parts are aligned correctly, contributing to a more effective and stable hitch setup.
By assembling these materials and tools, you create the foundation for crafting a high-quality hitch tightener.
How Do You Assemble a Hitch Tightener?
Designing the Blueprint
Start by sketching a blueprint for your hitch tightener. This design should factor in:
- Dimensions of the hitch receiver:
When designing the blueprint for your hitch tightener, accurately measuring the dimensions of the hitch receiver is crucial. The receiver’s width, height, and depth must be carefully considered to ensure the tightener fits securely. Precise measurements of the receiver’s opening and the space available for attachment will determine the size and shape of the tightener components, including U-bolts or clamps. This step ensures that all parts are compatible and that the tightener functions effectively without any gaps or movement.
- Placement of the tightening mechanism:
The placement of the tightening mechanism is a key aspect of the blueprint. It should be positioned for easy access and optimal leverage, allowing the user to tighten or adjust the hitch securely. Consideration must be given to the orientation of bolts, screws, or clamps to ensure they align with the hitch receiver and provide adequate tension. This placement should also ensure that the tightening mechanism does not interfere with the function of other hitch components, offering smooth and efficient operation during use.
- Space for anti-vibration pads:
Allocating space for anti-vibration pads is an important part of the blueprint design. These pads need to fit securely between the hitch tightener and the receiver to reduce noise and prevent movement. The blueprint should account for the thickness and material of the pads, ensuring there’s enough space for proper compression when the tightener is in use. Adequate room for the pads ensures they can effectively absorb vibrations, providing a quieter, more stable towing experience while maintaining a snug fit between the tightener and the receiver.
Cutting and Shaping the Components
Use a laser cutter or metal saw to shape the base plate and U-bolts. Ensure precision in dimensions to avoid loose or overly tight fittings. Smooth the edges to prevent damage to the hitch or vehicle.
Assembly Process
- Step 1: Begin the assembly process by attaching the U-bolts to the base plate. Position the U-bolts in alignment with the mounting holes on the base plate. Ensure that the U-bolts are oriented properly so that they can wrap around the hitch receiver securely. Use the appropriate size nuts and washers to fasten the U-bolts tightly to the base plate. This step is critical for creating a stable foundation for the hitch tightener and ensures that it will be securely mounted once the process is completed.
- Step 2:After securing the U-bolts to the base plate, the next step is to insert the anti-vibration pads between the base plate and the hitch receiver. Carefully position the pads to cover the area where the base plate will make contact with the receiver. These pads help absorb vibrations and prevent movement, which can lead to unwanted noise or damage over time. Make sure the pads are aligned properly to ensure even compression and effective vibration dampening once the tightener is fully secured.
- Step 3:In the final step, secure the bolts or clamps to tighten the entire setup. Position the base plate with the attached U-bolts and anti-vibration pads around the hitch receiver, ensuring proper alignment. Then, use a wrench to tighten the bolts or clamps to secure the entire assembly. Tighten them progressively and evenly to achieve a firm and stable connection. This step ensures that the hitch tightener is firmly in place, preventing any movement or rattling during use and ensuring safe towing performance.
Testing the Tightener
Once assembled, test the hitch tightener by mounting it onto a receiver. Check for:
- Stability under load
- Absence of rattling or vibrations
- Ease of adjustment
Regular testing ensures that your hitch tightener meets safety and functional requirements.
Why Should You Consider Customizing Your Hitch Tightener?
Tailored to Specific Needs
Customizing a hitch tightener allows you to address unique requirements such as:
- Heavy-duty towing: Reinforce the structure for larger trailers.
- Lightweight options: Use aluminum for easier handling.
Improved Aesthetics
Adding features like powder coating or a thermoplastic finish enhances both appearance and durability. These finishes protect against wear and tear, ensuring the tightener looks professional and lasts longer.
Cost Efficiency
For manufacturers, producing customized hitch tighteners can open opportunities in niche markets. Bulk production with adaptable designs can lead to greater customer satisfaction and profitability.
Conclusion
Making a hitch tightener involves choosing the right materials, precise assembly, and customization to suit various towing needs. By focusing on quality and functionality, you can create a product that ensures safety, minimizes vibration, and enhances the overall towing experience. If you want to get more information about this product, you can contact us at info@qdkshd.com.
References
1. Industry guidelines on trailer hitch safety and components.
2. Research on anti-vibration materials for towing applications.
3. Best practices for manufacturing with galvanized steel and stainless steel.
4. Technical specifications for U-bolts in automotive applications.
5. Guides on thermoplastic coatings for metal protection.
6. Insights from towing professionals on hitch maintenance and customization.
Send Inquiry
You may like

